What is Job Costing?
In construction, job costing tracks both direct and indirect costs for a specific project. By treating each project as its own "profit center" contractors can measure actual performance against projected costs, control costs, refine their ideal (and most profitable) types of jobs, and improve overall profitability.
Why Job Costing is Critical for the Success of Construction Firms
Job costing isn't just about tracking expenses, it's the foundation for running a profitable construction business. Without accurate job costing, contractors operate in the dark, making decisions based on gut feelings rather than hard data.
Here's why job costing matters:
- Profit protection: Identifies which projects are actually making money versus those that are bleeding cash, even when they seem successful on the surface
- Competitive bidding: Provides historical cost data to create more accurate estimates, helping you win profitable work while avoiding underpriced jobs
- Cash flow management: Tracks committed costs and upcoming expenses, giving you visibility into future cash needs before they become critical
- Performance accountability: Shows exactly where money is being spent on each project, making it easier to hold teams accountable and identify training needs
- Strategic growth: Reveals which types of projects align with your operational strengths, guiding business development efforts toward higher-margin work
The Job Costing Process
In construction job costing, the estimated project costs are used to bid and win the project, then form the budget to track cost and performance. Ultimately, the data from your job cost ledger should seamlessly integrate with your general ledger (specifically the accounts related to your cost of goods sold). This gives you a comprehensive view of how each individual project is performing.
But job costing is so much more than just tracking expenses; it’s a strategic tool that can improve your company’s bottom line and cash flow. When done right, you can scale this system across a portfolio of projects and create similar, predictable outcomes for your construction business as a whole, helping you achieve healthy, consistent growth over time.
The Builder’s Feedback Loop
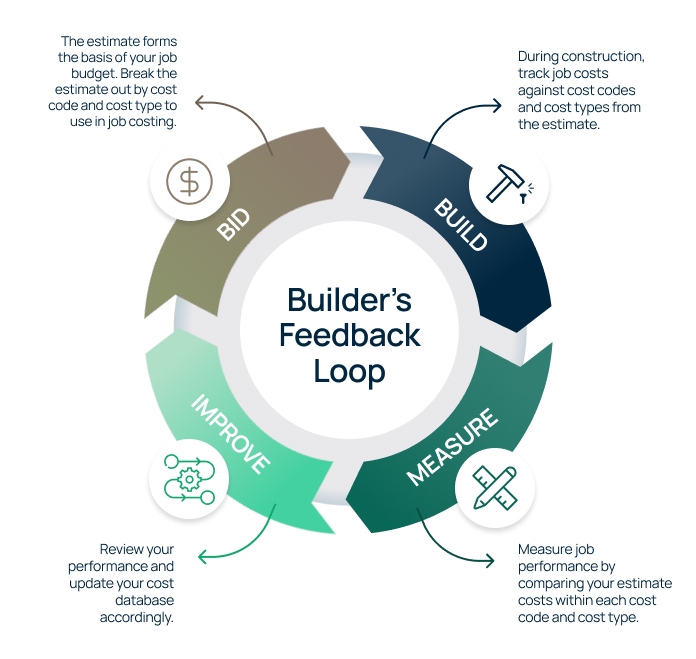
At its core, job costing is part of a feedback loop used to improve the efficiency of current and future projects by capturing performance and cost data. We like to call this the builders feedback loop and will cover it in more detail later.
For now, let’s focus on one of the most important parts of that process: setting up an effective job costing system.
Building an Effective Job Costing System
If you think job costing lands squarely on your project management team’s shoulders, think again. The reality is that job costing takes place across your entire organization, from the field to your back office. This means that your job costing system needs to be integrated into your estimating, project management, and accounting systems.
Basically, everyone needs to be singing from the same sheet of music – and that starts with setting up a cost coding system.
Essential Components of Job Costing
An effective job costing system relies on four core components working together seamlessly:
- Cost structure: Your job codes, phase codes, cost codes, and cost types that organize all expenses by project and category
- Budget management: Original estimates, approved change orders, and revised budgets that serve as your financial roadmap
- Cost tracking: Real-time capture of labor hours, material purchases, equipment usage, and subcontractor expenses as they occur
- Commitment tracking: Purchase orders and subcontracts that represent future financial obligations, giving you a complete picture of project costs
These components must work together to provide accurate, timely cost information that enables proactive project management rather than reactive reporting
How to Set Up a Cost Coding System
You can’t build an effective job costing system without setting up structured cost codes that encompass multiple levels of tracking. To do this, start by categorizing the various costs that it takes to complete a project or your scope of the project. The coding consists of job > phase > cost code > cost type. The level of depth you’ll use will vary depending on the size and complexity of the projects you’re building. Just make sure your cost coding structure is simple enough that anyone in the field can understand and implement it.
Before we get into some real-world examples, here are a few guiding principles on the level of detail you should layer into your cost coding system:
General Contractors – At a minimum, GCs need to set up and track Job Code > Cost Codes > Cost Types. Job phases are optional and should only be used when you’re tracking projects that A) have multiple buildings/floors or B) need to be broken down by each building as a sub-project.
Subcontractors – Subs need to set up and track Job Code > Cost Types. Cost codes are optional and should only be used if you’re working on larger projects with lots of subsystems, such as mechanical, or electrical contractors.
Job Codes
Each job is assigned a unique number for tagging all project-related expenses against. The most common method uses the year a project begins followed by a sequential number, like 01, 02, and 03. For example, 2401 for the first project of 2024 followed by 2402, and 2403 for the second and third projects of the year. This method is very common because it’s simple and proven in the construction industry.
In practice, every purchase order, subcontract, timesheet entry, and/or any other expense should reference the job code so expenses can be traced back to the job. If you take anything from this guide, it should be this: Set up job codes and at a minimum tie all expenses back to each job so you can compare them to the total estimated budget at project completion.
Phase Codes (Optional)
If used, phases divide jobs further into separate structures or cost groupings, enhancing the precision of cost tracking and accountability. We typically use phase codes for larger projects where there are multiple buildings or floors. Phase codes are simple sequential numbers that are unique to the job and are used in conjunction with the project code. For example: 2401–01, 2401-02, 2401-03 where “2401” is the job code and “01” is the phase and might be one of many buildings being constructed.
Cost Types
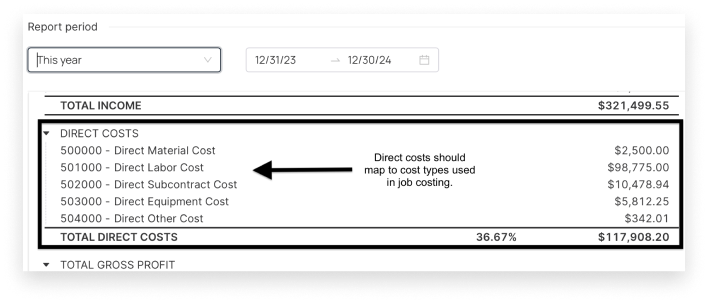
Each cost can be associated with both cost codes and cost types. Cost types include labor, materials, subcontractors, equipment, and other categories. From an accounting perspective, the cost type should map to the general ledger accounts that make up your cost of goods (COGs). As a contractor, you’ll want to have your chart of accounts set up to include direct job cost accounts for labor, materials, subcontractors, equipment, and other. These accounts represent the costs typically required to complete a project.
Cost Codes
Cost codes provide budget categories for expenses on a project and are used by your estimating, accounting, and project management teams to make sure all costs are tracked and managed consistently throughout projects. Cost codes should match up with the way the job is bought out, along with how costs are being tracked.
In terms of setup, they can either be a flat numbering system that aligns to the different divisions of work, such as “01 – General Requirements, 02 – Existing Conditions, 03 – Concrete”, or they can be hierarchical with each subsequent number representing a greater level of detail within the coding system (“01 00 00 – General Requirements, 01 10 00 – Summary of Work”). In this example, “Summary of Work” is a subcategory under the General Requirements cost code.

Project Budget Example
Now that we’ve taken a closer look at how each component of the cost coding structure works, let’s check out an example budget that shows a project broken out by cost codes:
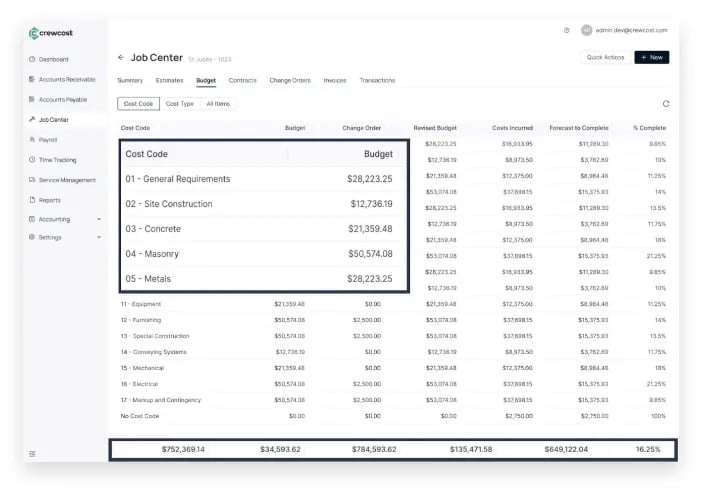
The leftmost column of the budget shows the cost code and name, followed by the original budget, approved change orders, revised budget (original + change orders), costs incurred, forecast to complete, and percent complete. As you move down, you’ll see budget lines for each cost code, with the job totals at the bottom. As costs are incurred and coded to the job, they update the appropriate columns.
If we go over budget, the overruns are shown in red. We can click on the costs incurred column at the cost code level to review the transactions and confirm the costs have been coded correctly. That brings us to our next point.
For a cost coding system to be successful, everyone needs to use it consistently. If the field team enters work performed under a different cost code than the estimator, that data won’t be very helpful in managing the project or bidding on future projects. To ensure consistency, you’ll need to standardize the cost coding system, as well as document and train your team on how to use it. This might look like a cost code list and instructions for when to use each one.
Lastly, you want to try and match your cost codes to vendors. This makes it easier to identify issues and avoid splitting cost codes between different subs and suppliers.
Reporting Costs vs. Controlling Costs
With job costing, costs incurred and anticipated costs must be entered early enough in the process that you can manage and control them (vs. reactively reporting after the work is complete). To proactively manage costs, you’ll need to enter uncommitted and committed expenses before paying them, so you can review and identify anything that’s outside of the budget. By entering these expenses early, you can estimate the cost of completion and make adjustments as needed.
Commitments
To fully understand a project’s financial health, you have to consider both invoiced costs and committed costs. Committed costs are expenses your company has agreed to pay through purchase orders and subcontracts. Purchase orders are used for tracking things like equipment and direct material costs, while subcontracts are for work subcontracted out. While these aren’t recorded as expenses, they represent financial commitments that affect a project’s budget.
Tracking committed costs can be tricky if your accounting system doesn’t support purchase orders and subcontracts. In this case, you’ll need to handle them outside of your accounting system. You can do this using spreadsheets – just add committed costs and committed costs invoiced columns to your budget and estimate your cost at completion. This involves combining the balance of your committed cost column and costs incurred and comparing against the budgeted line item.
Mapping committed costs to your budget requires that the line items in your subcontract schedule of values include the same cost codes and cost types that you are tracking in your budget.
Labor Tracking
Labor costs account for around 60% of total expenses on most jobs, which means they pose a significant risk to project budgets. To mitigate this risk, make sure you’re closely monitoring direct labor hours for self-performed work. This involves tracking the hours worked by field teams against specific job and cost codes in real-time. By multiplying these hours by the fully burdened labor costs, you can calculate the total costs incurred to date. With this data, you can determine the percentage of completion, comparing actual costs against budgeted amounts.
Note: Keep in mind, indirect labor and indirect material costs incurred by your subcontractors aren’t tracked in this manner. Those are managed through your subcontract.
Additionally, don’t forget to track work progress either through daily logs or superintendent estimates. This ongoing comparison between labor hours and work progress enables timely adjustments, ultimately helping you avoid budget overruns before they become problematic.
If your job costing system doesn’t directly integrate with your time tracking and accounting system, it can be hard to track direct labor costs effectively because you’re relying on payroll data that lags behind the job. If you can’t see how labor impacted the work that took place that week, it’s going to be hard to manage performance.
We suggest monitoring direct labor hours burned on a weekly basis and comparing them with the work put in place. We aren’t going to dive into productivity reporting here, but it’s not a bad idea to report work put in place on your daily logs and check daily productivity.
🔎 Dive Deeper: The Basics of Cost Forecasting in Construction
Common Job Costing Challenges and Solutions
Even well-intentioned contractors run into obstacles when implementing their job costing system. Here are the most common challenges we see and practical solutions to overcome them:
Getting Field Teams to Buy In
The biggest hurdle is often field resistance to new processes. Superintendents and foremen worry that detailed cost tracking will slow them down or create additional paperwork.
Solution: Focus on showing field teams how job costing helps them, not just the office. Demonstrate how real-time cost visibility helps them identify problems early, justify additional resources, and prove their performance on successful projects. Provide user-friendly tools that integrate with their existing workflows rather than adding separate steps.
Inconsistent Cost Coding
Different team members interpreting cost codes differently creates unreliable data that undermines the entire system.
Solution: Create a cost code dictionary with specific examples and clear guidelines for borderline situations. Hold regular training sessions and designate people who can answer questions and maintain consistency.
Delayed Cost Entry
Waiting until invoices arrive to enter costs means you're always looking in the rearview mirror instead of managing your finances proactively.
Solution: Implement commitment tracking through purchase orders and subcontracts. This gives you immediate visibility into future costs so you can manage budgets in real-time rather than after money is already spent.
Overhead Allocation Complexity
Many contractors struggle with how to fairly distribute indirect costs across projects without creating overly complex systems.
Solution: Start simple with percentage-based allocation and refine over time. Use total direct costs or labor hours as your initial allocation base, then add sophistication as your team becomes comfortable with the process.
The Builder’s Feedback Loop Mindset
Back to the Builder’s Feedback Loop we mentioned earlier. Embracing construction job costing is a great first step toward better profitability and long-term success, but it’s just one piece of a larger concept – one we call the Builder’s Feedback Loop.
This is a lean construction principle that’s rooted in continuous learning and improvement. It’s an iterative process that encompasses four stages: bid, build, measure, and improve. The loop begins with creating accurate estimates (bid), then moves to actual construction (build), followed by comparing estimated costs with actual costs (measure), and finally, using this comparison to guide the project to success and refine future estimates (improve).
Job costing takes place during the build step, and job cost data collected here informs future estimates. By continuously updating your historical cost database with learned performance data from jobs, you can:
- fine-tune your bidding strategies to be more competitive and profitable
- reduce cost overruns
- steer clear of jobs that don’t align with your operational strengths
When paired with accurate job costing, this process can give you the tools you need to continuously improve your business over time by producing consistent profit margins on similar projects and avoiding specific projects that do not fit your operational strengths. By knowing your strengths, you can become more efficient, keeping total job costs down on good fit projects, and avoid estimating bad fit projects reducing your overhead rate.
Here’s a more detailed breakdown of each of the four stages:
Bid: This initial stage is all about creating accurate estimates. It involves a detailed breakdown of costs for every aspect of the project, considering factors like materials, labor, equipment, subcontractors, and overheads. How precise you are in this phase sets the tone for the entire project’s financial success.
👉 Check out our guide to mastering the bidding process.
Build: During the construction phase, the main focus is adhering to your estimated costs and timelines. This is where the practical challenges of construction meet the theoretical estimates made in the bid stage. To make sure nothing slips through the cracks, you’ll need to maintain detailed records of all expenditures and progress as the project is built.
Measure: This is arguably the most crucial phase in the loop. The measuring stage involves thoroughly comparing a job’s estimated costs against the actual costs incurred during construction. This step is not only about identifying variances but understanding the reasons behind them. It’s a phase of learning and gathering insights.
Improve: The final stage uses these insights gained to optimize future estimates and strategies. This might look like adjusting future bids to allocate more time and budget to tasks that historically take longer or are more complex, like those in hospital builds versus retail constructions. It can also mean reducing estimates where you find yourself consistently under budget, thereby enhancing competitiveness and profitability.
At the end of the day, the Builder’s Feedback Loop is more than a process; it’s a mindset that encourages continuous learning and adaptation. By embracing this loop, you can minimize cost overruns, avoid inefficient project types, and fine-tune your bidding strategies – ultimately allowing you to win more contracts.
Integrating Job Costing Into Your General Ledger
Now let’s talk about integrating job costing into your larger accounting system. It’s important to work your job costing system into your general ledger to ensure revenue and costs on the job cost ledger align with those on your income statement.
For most construction companies, it doesn’t make sense to add cost coding layers to the general ledger because there are too many. At the same time, your cost types should always align to the direct cost accounts used to make up the cost of goods sold. When you add up the costs from your job costing subledger, they should equal the costs displayed in the cost of goods section of your income statement for that time period. If they don’t match, you’ll need to do some investigating to sniff out the problem.
Best Practices for Accurate Job Costing
Implementing job costing successfully requires more than just good software, it demands disciplined processes and organizational commitment. Here are the proven best practices that separate successful job costing implementations from failed attempts.
1. Standardize Your Processes
Create detailed procedures for cost code assignment, time entry, and expense allocation. Document these processes clearly and train all team members consistently. When everyone follows the same procedures, your data becomes reliable and actionable.
2. Implement Approval Workflows
Require supervisor approval for all cost entries above certain thresholds. This catches coding errors early and ensures unusual expenses are properly reviewed before they impact project budgets.
3. Regular Data Validation
Perform weekly reviews of cost data to identify and correct errors quickly. Look for expenses coded to the wrong projects, missing time entries, and unusual variances that might indicate data problems.
4. Focus on Integration
Ensure your job costing system integrates seamlessly with time tracking, accounts payable, and project management systems. Manual data entry between systems creates opportunities for errors and delays.
How Job Costing Software Can Streamline Financial Management
If all of this sounds overwhelming, don’t worry. The right construction accounting software can turn job costing from a confusing tangle of spreadsheets into a well-oiled machine. And while tools like QuickBooks offer basic functionalities, they fall short in addressing the specific needs of construction job costing.
Where Spreadsheets and Generic Accounting Systems Fall Short
Because our industry is so complex, spreadsheets and generic accounting software just don’t cut it. Here's why:
- Generic accounting systems don't solve for the complexity of construction: These platforms don’t typically support construction-specific elements like cost codes and cost types, leading to less accurate cost tracking.
- Data siloes: Essential job costing data often becomes isolated in separate systems, making it hard to gain a unified view of a project’s financial status. On top of that, integrations between these data silos are often lacking.
- Risk of errors and inefficiency: Manual data entry in spreadsheets is time-consuming and prone to errors, which can result in inaccurate financial reporting and decision-making.
- Delayed responses to cost changes: Without real-time tracking capabilities, you can't react to rapid cost changes in dynamic construction environments.
- Inadequate reporting tools: Generic accounting software lacks comprehensive reporting and forecasting tools tailored for construction job costing, putting a damper on strategic financial planning and analysis.
The good news is that contractors have more options today. CrewCost's job costing software addresses all of these challenges head-on, offering a streamlined workflow from estimates to job budgets that give you constant insight into your profitability at a project level.

With our integrated approach, all your job costing capabilities are integrated with your accounting functions, so you can make informed decisions based on data that's always up to date. And, it's 100% cloud based, so you can access your data from anywhere — the office, the jobsite or when you're working from home — all without the pain of VPNs and the maintenance of on-prem software.
See it for yourself. 👉 Schedule a demo.
Last Thoughts
If you want your contracting business to grow sustainably, you have to master job costing. By implementing detailed, standardized job costing practices, regularly comparing estimated to actual costs, and using the Builder’s Feedback Loop, you and your team can make leaps and bounds when it comes to job profitability and company financial performance.